« Back to Liferay IDE
Liferay IDE Installation Guide
Alternative Languages: 日本語
This document is a detailed guide to installation of Liferay IDE.
Requirements #
- Java 5.0 JRE
- Eclipse Indigo JavaEE (3.7.x) or greater
Installation steps #
- 1. Install Eclipse Indigo JavaEE package or greater
- 2. Run eclipse.exe
- 3. When eclipse opens, go to Help > Install New Software...

- 4. Click "Add..." button to open Add Site dialog
- 5. Type in Liferay IDE for name, and location use one of the following URLs
Eclipse Update sites #
Latest Stable Release URL (1.6.x) - http://releases.liferay.com/tools/ide/latest/stable/
Latest Milestone Release URL (2.x) - http://releases.liferay.com/tools/ide/latest/milestone/ (Unstable version)

- 6. Select OK
- 7. Select the Liferay IDE site from the combo selection box.
- 8. When the table refreshes you should see Liferay Tooling category and one entry for Liferay IDE feature, select the checkbox to install the feature.

- 9. Click Next and then click Finish to begin the install
- 10. After plugins download and install you will have to accept that the content is unsigned and then restart eclipse.
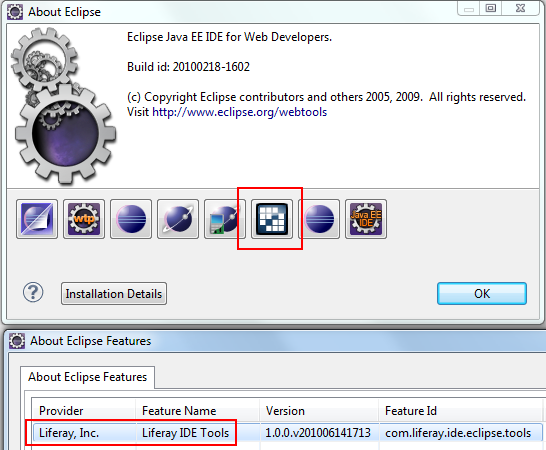
- 11. After you restart, go to Help > About Eclipse and you should see a Icon badge for Liferay IDE that shows you have it properly installed.
Alternative installation #
- 5a. Instead of typing in URL you can download the the archived update site from this link liferay-ide-eclipse-updatesite-1.6.2.zip
- Or if you want to use latest milestone you can access that archived updatesite here: liferay-ide-updatesite-2.0.0-m2-201311051611.zip
- 5b. In Add Site dialog, click the "Archive" button and browse to the location of the downloaded zip file.
- 5c. Installation proceeds normally
Check installation #
If everything installed correctly you should be able to begin using the IDE. You can see a getting started tutorial here:
297304 Views
